Iframes were once popular to hide content from the Search Spiders, a form of Blackhat SEO. Now that these spiders can see through iframes, I don't recommend using them for that purpose; it could get your site banned. However, they can be useful for displaying other sites in your webpages for various purposed. The basic code is:
<iframe src="URL" width="200" height="200">
Sorry, there was a problem loading this site. Maybe we typed the URL wrong or you can get a new browser <a href="http://www.opera.com">Here</a></iframe>
This iframe displayed fireburst.webs.com in a width and height of 500. It was simple to create. iFrames can be very useful for a webmaster, as long as you don't use them for hiding content.
Showing posts with label site. Show all posts
Showing posts with label site. Show all posts
Wednesday, December 26, 2012

Tuesday, November 20, 2012
Embed RSS feeds into a webpage
In websites such as Fireburst News, you will see RSS feeds embedded into the webpage. Also, you may want to display your RSS feed in your site's homepage. To make an RSS file, visit this post. Here's the code to embed my blog's RSS:
<script src="http://gmodules.com/ig/ifr?url=http://sethsdiscoveries.blogspot.com/feeds/posts/default&synd=open&w=320&h=200&title=&border=%23ffffff%7C3px%2C1px+solid+%23999999&output=js"></script>
<script src="http://gmodules.com/ig/ifr?url=http://sethsdiscoveries.blogspot.com/feeds/posts/default&synd=open&w=320&h=200&title=&border=%23ffffff%7C3px%2C1px+solid+%23999999&output=js"></script>
Thursday, November 15, 2012
XML links or Xlink
In XML, tags are made up which makes XML links almost impossible. The solution to this is Xlink, which is a standard for XML links. To display links use a code like this;
<?xml version="1.0"?>
<homepages xmlns:xlink="http://www.google.com">
<homepage xlink:type="simple"
xlink:href="http://ddg.gg">Duck Duck Go</homepage>
<homepage xlink:type="simple"
xlink:href="http://www.google.com">Google</homepage>
</homepages>
An easy example would be this;
<plantstore xmlns:xlink="http://www.w3.org/1999/xlink">
<plant name="Petunia">
<description
xlink:type="simple"
xlink:href="http://plants.com/images/petunia.png"
xlink:show="new">
The familiar petunia at a bargain price.
</description>
</book>
</bookstore>
You can repeat the highlighted text as often as you like.
<?xml version="1.0"?>
<homepages xmlns:xlink="http://www.google.com">
<homepage xlink:type="simple"
xlink:href="http://ddg.gg">Duck Duck Go</homepage>
<homepage xlink:type="simple"
xlink:href="http://www.google.com">Google</homepage>
</homepages>
An easy example would be this;
<plantstore xmlns:xlink="http://www.w3.org/1999/xlink">
<plant name="Petunia">
<description
xlink:type="simple"
xlink:href="http://plants.com/images/petunia.png"
xlink:show="new">
The familiar petunia at a bargain price.
</description>
</book>
</bookstore>
You can repeat the highlighted text as often as you like.
Make a webpage RSS feed
Most news sites have things called RSS feeds that you subscribe to and get updates using a feed-reader. It's actually easy to make an RSS feed, using basic XML. This code goes into notepad. Update whenever you have a new post you want to display in the feed
<?xml version="1.0" encoding="ISO-8859-1" ?>
<rss version="2.0"><channel>
<title>New Feed One</title>
<link>http://site.com/newfeedone</link>
<description>Start text on articles</description>
<item>
<title>New Post Two</title>
<link>http://site.com/newposttwo</link>
<description>New post on New Post Two</description>
</item>
<item>
<title>New Post Three</title>
<link>http://www.site.com/newpostthree</link>
<description>description</description>
</item>
</channel>
</rss>
Save as "feed.xml" but you can change anything except .xml.
Add categories with this code:
<category>Web development</category>
<?xml version="1.0" encoding="ISO-8859-1" ?>
<rss version="2.0"><channel>
<title>New Feed One</title>
<link>http://site.com/newfeedone</link>
<description>Start text on articles</description>
<item>
<title>New Post Two</title>
<link>http://site.com/newposttwo</link>
<description>New post on New Post Two</description>
</item>
<item>
<title>New Post Three</title>
<link>http://www.site.com/newpostthree</link>
<description>description</description>
</item>
</channel>
</rss>
Save as "feed.xml" but you can change anything except .xml.
Add categories with this code:
<category>Web development</category>
Make Image Links open in a New Tab
Many people want to make image links open in a new tab, like they do on my Alternative Search Engines list. It's a fairly simple code too:
<a href="http://www.clipotech.com/" target="_blank"><img border="0" height="75" src="http://4.bp.blogspot.com/_QF2exREIx20/SVDCxpqD2jI/AAAAAAAABtg/cJuBW3wQpLw/S1600-R/0007.PNG"/></a>
That will make a link that goes like this:
You can remove any text that's marked in red.
<a href="http://www.clipotech.com/" target="_blank"><img border="0" height="75" src="http://4.bp.blogspot.com/_QF2exREIx20/SVDCxpqD2jI/AAAAAAAABtg/cJuBW3wQpLw/S1600-R/0007.PNG"/></a>
That will make a link that goes like this:

You can remove any text that's marked in red.
Wednesday, November 7, 2012
Tell robots not to index a page, part 1
Robots are little pieces of technology that find links for the search engines. This makes it so the pages discovered by the robots, (also called "spiders.") appear in the search engine's results. This is part one of how to keep Google, Yahoo, Bing, Gigablast, Fireburst and other search engines from indexing a single page or pages of a site. This is done by meta tags inserted between the <head> and </head> tags.
Keep a bot from indexing a page
To keep a "good" bot from adding a page to its index insert this meta tag in the head:
<meta name="robots" content="noindex" />
Keep bots from following links on a page
<meta name="robots" content="nofollow" />
Keep a bot from following a specific link
<a href="URL" rel="nofollow">link text</a>
Other bot restriction Tags
Keep bots from indexing images on your page:
<meta name="robots" content="noimageindex" />
Keep bots from archiving a copy of your page:
<meta name="robots" content="noarchive" />
Keep bots from translating the page in search result
<meta name="robots" content="notranslate" />
Keep a bot from indexing a page
To keep a "good" bot from adding a page to its index insert this meta tag in the head:
<meta name="robots" content="noindex" />
Keep bots from following links on a page
<meta name="robots" content="nofollow" />
Keep a bot from following a specific link
<a href="URL" rel="nofollow">link text</a>
Other bot restriction Tags
Keep bots from indexing images on your page:
<meta name="robots" content="noimageindex" />
Keep bots from archiving a copy of your page:
<meta name="robots" content="noarchive" />
Keep bots from translating the page in search result
<meta name="robots" content="notranslate" />
Saturday, November 3, 2012
Make a Firefox search Add-on for a GCSE
Adding an search engine to Firefox is the only disadvantage to Firefox. You have to install an add-on. Compare that to Opera, where you can right click the search field. To make things worse, search add-ons are in XML. I could go on and on, but I will put my dialog at the end and you may read it if you like.
TO make this search addon your GCSE will have to follow this tutorial:http://sethsdiscoveries.blogspot.com/2012/10/two-page-more-customizable-gcse-for.html
Open notepad and enter this code:
<OpenSearchDescription xmlns="http://a9.com/-/spec/opensearch/1.1/">
<ShortName>
Seth's Tutorials
</ShortName>
<Description>
Search for code and PC tutorials by Seth Sevenyoln</Description>
<InputEncoding>
UTF-8
</InputEncoding>
<OutputEncoding>
UTF-8
</OutputEncoding>
<AdultContent>
false
</AdultContent>
<Image height="16" width="16" type="image/x-icon">
http://sethsdiscoveries.blogspot.com/favicon.ico</Image>
<Url type="text/html" template="http://sethsdiscoveries.blogspot.com/p/search-results.html?q={searchTerms}"/>
<SearchForm>
http://sethsdiscoveries.blogspot.com
</SearchForm>
</OpenSearchDescription>
Seth's Tutorials is the name of the add-on and the name of the search engine displayed in the search box. Search for code and PC tutorials by Seth Sevenyoln is the description which is displayed in the search results of Mozilla add-ons directory. http://sethsdiscoveries.blogspot.com/favicon.ico is the URL of the icon and no it doesn't work for me either. http://sethsdiscoveries.blogspot.com/p/search-results.html?q= is the URL where results are displayed. For example, if you wanted to search fireburst.webs.com the URL would be fireburst.webs.com/searchresults.htm?q=. A way to find this out is to search for "n" and take the "n" out of the URL. http://sethsdiscoveries.blogspot.com is the URL of your homepage. Mine looked like this:
 Then save it as "searchname.xml" To save it as an xml file you will need to put the filename in quotations. Mine looked like this:
 Open Firefox and navigate to addons.mozilla.org. Log in or sign up with a developers account(free). Follow the steps and submit your addon. You're finished. You can download the add-on for my blog here
TO make this search addon your GCSE will have to follow this tutorial:http://sethsdiscoveries.blogspot.com/2012/10/two-page-more-customizable-gcse-for.html
Open notepad and enter this code:
<OpenSearchDescription xmlns="http://a9.com/-/spec/opensearch/1.1/">
<ShortName>
Seth's Tutorials
</ShortName>
<Description>
Search for code and PC tutorials by Seth Sevenyoln</Description>
<InputEncoding>
UTF-8
</InputEncoding>
<OutputEncoding>
UTF-8
</OutputEncoding>
<AdultContent>
false
</AdultContent>
<Image height="16" width="16" type="image/x-icon">
http://sethsdiscoveries.blogspot.com/favicon.ico</Image>
<Url type="text/html" template="http://sethsdiscoveries.blogspot.com/p/search-results.html?q={searchTerms}"/>
<SearchForm>
http://sethsdiscoveries.blogspot.com
</SearchForm>
</OpenSearchDescription>
Seth's Tutorials is the name of the add-on and the name of the search engine displayed in the search box. Search for code and PC tutorials by Seth Sevenyoln is the description which is displayed in the search results of Mozilla add-ons directory. http://sethsdiscoveries.blogspot.com/favicon.ico is the URL of the icon and no it doesn't work for me either. http://sethsdiscoveries.blogspot.com/p/search-results.html?q= is the URL where results are displayed. For example, if you wanted to search fireburst.webs.com the URL would be fireburst.webs.com/searchresults.htm?q=. A way to find this out is to search for "n" and take the "n" out of the URL. http://sethsdiscoveries.blogspot.com is the URL of your homepage. Mine looked like this:


Tuesday, October 30, 2012
Special Symbols ¢, ™, ® and others
Trademark, copyright, and other symbols may be displayed in webpages by way of simple HTML code. Here they are:
® ®
¢ ¢
™ ™
¿ ¿
© ©
÷ ÷
§ §
¥ ¥
£ £
€ €
µ µ
¶ ¶
± ±
· ·
How to display this chart with the codes:
</span>® &reg;<br />
¢ &cent; <br />
™ &trade;<br />
¿ &iquest;<br />
© &copy;<br />
÷ &divide;<br />
§ &sect;<br />
¥ &yen;<br />
£ &pound;<br />
€ &euro;<br />
µ &micro;<br />
¶ &para;<br />
± &plusmn; <br />
· &middot;<br />
<br />
® ®
¢ ¢
™ ™
¿ ¿
© ©
÷ ÷
§ §
¥ ¥
£ £
€ €
µ µ
¶ ¶
± ±
· ·
How to display this chart with the codes:
</span>® &reg;<br />
¢ &cent; <br />
™ &trade;<br />
¿ &iquest;<br />
© &copy;<br />
÷ &divide;<br />
§ &sect;<br />
¥ &yen;<br />
£ &pound;<br />
€ &euro;<br />
µ &micro;<br />
¶ &para;<br />
± &plusmn; <br />
· &middot;<br />
<br />
Monday, October 29, 2012
Make Google Custom Search results open in same tab
One of the problems I had with GCSE on my blog was that it always opened links in a new window or tab. This wasn't very convenient, but I only had to change a little code in the results code.
Before Modification:
<!-- Put the following javascript before the closing </head> tag. -->
<script>
(function() {
var cx = '010940491106818468665:ak7ru-numse';
var gcse = document.createElement('script'); gcse.type = 'text/javascript'; gcse.async = true;
gcse.src = (document.location.protocol == 'https:' ? 'https:' : 'http:') +
'//' + cx;
var s = document.getElementsByTagName('script')[0]; s.parentNode.insertBefore(gcse, s);
})();
</script>
<!-- Place this tag where you want the search results to render -->
<gcse:searchresults-only></gcse:searchresults-only>
After Modification (when the results open in same tab):
<!-- Put the following javascript before the closing </head> tag. -->
<script>
(function() {
var cx = '010940491106818468665:ak7ru-numse';
var gcse = document.createElement('script'); gcse.type = 'text/javascript'; gcse.async = true;
gcse.src = (document.location.protocol == 'https:' ? 'https:' : 'http:') +
'//' + cx;
var s = document.getElementsByTagName('script')[0]; s.parentNode.insertBefore(gcse, s);
})();
</script>
<!-- Place this tag where you want the search results to render -->
<gcse:searchresults-only linktarget="_parent"></gcse:searchresults-only>
I replaced <gcse:searchresults-only> with <gcse:searchresults-only linktarget="_parent">.
Before Modification:
<!-- Put the following javascript before the closing </head> tag. -->
<script>
(function() {
var cx = '010940491106818468665:ak7ru-numse';
var gcse = document.createElement('script'); gcse.type = 'text/javascript'; gcse.async = true;
gcse.src = (document.location.protocol == 'https:' ? 'https:' : 'http:') +
'//' + cx;
var s = document.getElementsByTagName('script')[0]; s.parentNode.insertBefore(gcse, s);
})();
</script>
<!-- Place this tag where you want the search results to render -->
<gcse:searchresults-only></gcse:searchresults-only>
After Modification (when the results open in same tab):
<!-- Put the following javascript before the closing </head> tag. -->
<script>
(function() {
var cx = '010940491106818468665:ak7ru-numse';
var gcse = document.createElement('script'); gcse.type = 'text/javascript'; gcse.async = true;
gcse.src = (document.location.protocol == 'https:' ? 'https:' : 'http:') +
'//' + cx;
var s = document.getElementsByTagName('script')[0]; s.parentNode.insertBefore(gcse, s);
})();
</script>
<!-- Place this tag where you want the search results to render -->
<gcse:searchresults-only linktarget="_parent"></gcse:searchresults-only>
I replaced <gcse:searchresults-only> with <gcse:searchresults-only linktarget="_parent">.
Sunday, October 28, 2012
Site Title, Description & Tags in HTML
The title, description and tags are viable to SEO. Search engines use these to help match your site with searches. Most site builders offer completely customized title, description and tags but you need to add these manually in HTML, PHP, and other manually edited documents. The code is inserted into the <head> and </head> tags:
<TITLE>My Site's Title</TITLE>
<meta name="keywords" content="Separate keywords with commas.">
<meta name="description" content="My site's description, two or three sentences.">
<meta name="author" content="Your Name">
A well formed head tag will follow this format:
<head>
<TITLE>My Site's Title</TITLE>
<meta name="keywords" content="Separate keywords with commas.">
<meta name="description" content="My site's description, two or three sentences.">
<link rel="stylesheet" type="text/css" href="stylesheet.css" />
<meta http-equiv="refresh" content="100">
<link rel="Shortcut Icon" href="/favicon.ico">
</head>
For more <head> tags see all posts with the label head. You may omit the meta tags about keyword and description. You may omit any of these <head> tags.
<TITLE>My Site's Title</TITLE>
<meta name="keywords" content="Separate keywords with commas.">
<meta name="description" content="My site's description, two or three sentences.">
<meta name="author" content="Your Name">
A well formed head tag will follow this format:
<head>
<TITLE>My Site's Title</TITLE>
<meta name="keywords" content="Separate keywords with commas.">
<meta name="description" content="My site's description, two or three sentences.">
<link rel="stylesheet" type="text/css" href="stylesheet.css" />
<meta http-equiv="refresh" content="100">
<link rel="Shortcut Icon" href="/favicon.ico">
</head>
For more <head> tags see all posts with the label head. You may omit the meta tags about keyword and description. You may omit any of these <head> tags.
Thursday, October 25, 2012
Links, part 3: Colors & CSS
In a previous post I explained the link. In this post I will go into how to change link colors, add hover effects and visited colors. The first will be changing the link colors by some basic HTML in the body. Insert this code between the <body> and </body> tags.
<body link="#C0C0C0" vlink="#808080" alink="#FF0000">
body link is when the link is displayed on the page. #COCOCO is the blue you see everywhere. vlink is the visited color. #808080 is the purple you see on most pages when you revisit a page after clicking a link. #FF0000 is red, and alink is the hover color.
Link color in your CSS stylesheet
Its easy, and you can do even more, like making a link suddenly underline when hovered over. Here's the code:
a.nav:link {color: blue; text-decoration: none; }
a.nav:visited {color: purple; text-decoration: none; }
a.nav:hover {color: green; text-decoration: underline; }
a.nav:active {color: red; }
Multiple Link effects through CSS stylesheet
You can make "classes" of link effects in CSS that will make links in each class act differently. For example, you could make a class called nav for links in the body, and a class called foot for links in the footer. Here is the code:
a.nav:link {color: blue; text-decoration: none; }
a.nav:visited {color: purple; text-decoration: none; }
a.nav:hover {color: green; text-decoration: underline; }
a.nav:active {color: red; }
a.foot:link {color: red; font-size: 14pt; font-weight: bold; }
a.foot:visited {color: green; font-weight: bold; }
a.foot:hover {text-decoration: underline; background-color: blue; }
a.foot:active {color: orange; }Using the classes
It's much simpler than individually changing every link that you want different from the settings you put.
For the class nav use this code: <a href="URL" class="nav">Link Text</a>
For the class foot use this code: <a href="URL" class="nav">Link Text</a>
<body link="#C0C0C0" vlink="#808080" alink="#FF0000">
body link is when the link is displayed on the page. #COCOCO is the blue you see everywhere. vlink is the visited color. #808080 is the purple you see on most pages when you revisit a page after clicking a link. #FF0000 is red, and alink is the hover color.
Link color in your CSS stylesheet
Its easy, and you can do even more, like making a link suddenly underline when hovered over. Here's the code:
a.nav:link {color: blue; text-decoration: none; }
a.nav:visited {color: purple; text-decoration: none; }
a.nav:hover {color: green; text-decoration: underline; }
a.nav:active {color: red; }
Multiple Link effects through CSS stylesheet
You can make "classes" of link effects in CSS that will make links in each class act differently. For example, you could make a class called nav for links in the body, and a class called foot for links in the footer. Here is the code:
a.nav:link {color: blue; text-decoration: none; }
a.nav:visited {color: purple; text-decoration: none; }
a.nav:hover {color: green; text-decoration: underline; }
a.nav:active {color: red; }
a.foot:link {color: red; font-size: 14pt; font-weight: bold; }
a.foot:visited {color: green; font-weight: bold; }
a.foot:hover {text-decoration: underline; background-color: blue; }
a.foot:active {color: orange; }Using the classes
It's much simpler than individually changing every link that you want different from the settings you put.
For the class nav use this code: <a href="URL" class="nav">Link Text</a>
For the class foot use this code: <a href="URL" class="nav">Link Text</a>
Links, Part 1: The basic link
Links are an almost irremovable part of a site or even a page. Links are used to lead to other pages, other sites, even emails. Fortunately, links are very easy. In this post I will go over the hyperlink, the email link and the image link. The basic link code is <a href="http://sethstutorials.blogspot.com">Seth's Code & PC Tutorials</a> Replace with http://sethstutorials.blogspot.com with the address of the site you want to link to. Replace Seth's Code & PC Tutorials with the text you want your links to display.
Email Link
The email link is simple. The code is:
<a href="mailto:sethsevenyoln@aol.com">Email Me</a>
Replace sethsevenyoln@aol.com with your email address, and Email Me with the text you want displayed.
Image Link
The image link is a bit more complicated. Still, its quite possible. The code is:
<a href="http://fireburst.webs.com"><img src="image.gif" border="0"></a>
Replace http://fireburst.webs.com with the URL of the site you want to link to, and image.gif with the URL of the image you want displayed.
Opening a link in a new tab
If you want a link to be opened in a new tab, for the basic link use this code:
<a href="http://url" target="_blank">link text</a>
Email Link
The email link is simple. The code is:
<a href="mailto:sethsevenyoln@aol.com">Email Me</a>
Replace sethsevenyoln@aol.com with your email address, and Email Me with the text you want displayed.
Image Link
The image link is a bit more complicated. Still, its quite possible. The code is:
<a href="http://fireburst.webs.com"><img src="image.gif" border="0"></a>
Replace http://fireburst.webs.com with the URL of the site you want to link to, and image.gif with the URL of the image you want displayed.
Opening a link in a new tab
If you want a link to be opened in a new tab, for the basic link use this code:
<a href="http://url" target="_blank">link text</a>
Monday, September 24, 2012
How to creat your own free .tk domain
Domains are your name on the Internet. Domains cost money. Domains need all sorts of configurations. Domains are hard. So why not get a free hosted site at somewhere like webs.com, yola.com or sites.google.com? Yes but, yoursite.webs.com is not as professional sounding as yoursite.com or yoursite.tk. So here's how to creat your own .tk domain.
Navigate to http://dot.tk. Go to "login to my .tk" .

Navigate to http://dot.tk. Go to "login to my .tk" .

Log in with the account you want. I'll use Google. Its an easy step by step registration. Select 12 months or what you want, set your domain to redirecting to your URL and you are set!
Make Opera Compatable with any site
Sometimes, sites say that your Opera is not compatible. This means that you cannot use Opera to access that site. However, Opera offers a nifty way to get around this, for most sites support Opera 12 and up, even if they don't know it. And, with many Google services, you will see something like this:

So you right click on the site and it will display a menu. The second option from the bottom should be "edit site preferences". Click this and you should see something like this:

Click on "Network" and something like this should come up:

Click on the drop down menu where it says "identify as Opera and select Mask as Firefox. When you are finished you will see this:

Click "OK" and refresh the page. Do this to any page that says it is not compatible with Opera.
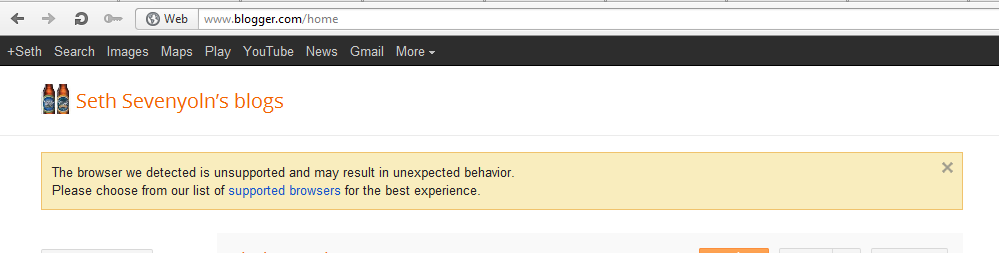
So you right click on the site and it will display a menu. The second option from the bottom should be "edit site preferences". Click this and you should see something like this:

Click on "Network" and something like this should come up:

Click on the drop down menu where it says "identify as Opera and select Mask as Firefox. When you are finished you will see this:

Click "OK" and refresh the page. Do this to any page that says it is not compatible with Opera.
Monday, April 30, 2012
How to make a basic Firefox Ad On with no coding knowledge
What you will need
Instructions
const tabs = require("tabs");
var widget = widgets.Widget({
id: "Ad On Name",
label: "Hover Text",
contentURL: "Ad On Icon URL: it does not have to be a .ico file. To find the icon of most(not all) sites, ad favicon.ico to the end of the homepage URL: example: mail.com/favicon.ico or fireburst.webs.com/favicon.ico",
onClick: function() {
tabs.open("Webpage URL");
}
});
save it. You can click test or download the ad on. After you download the ad on, move it the the top left hand corner of Firefox. That will install it. You may then upload it to addons.mozilla.org
- A Mozilla Developer's Account
- Internet Access
- Know how to copy and paste
- Mozilla Firefox
- Any website for the ad on to go to
Instructions
- Log in to addons.mozilla.org
- go to tools, then click on developerhub
- go to start making ad ons andSelect the ad on builder
- Log in with Browser ID
- below this line: "// This is an active module of the Adonname (1) Add-on" paste the folowing code, making changes where highlighted in red
const tabs = require("tabs");
var widget = widgets.Widget({
id: "Ad On Name",
label: "Hover Text",
contentURL: "Ad On Icon URL: it does not have to be a .ico file. To find the icon of most(not all) sites, ad favicon.ico to the end of the homepage URL: example: mail.com/favicon.ico or fireburst.webs.com/favicon.ico",
onClick: function() {
tabs.open("Webpage URL");
}
});
save it. You can click test or download the ad on. After you download the ad on, move it the the top left hand corner of Firefox. That will install it. You may then upload it to addons.mozilla.org
Subscribe to:
Posts (Atom)
