Showing posts with label fonts. Show all posts

Wednesday, January 2, 2013

Make a Maping Application

Have you ever wondered if you could make a mapping app? Its easy: just looking at the source for Fireburst Maps give you the complete code. Just paste this where you want the maps to appear: 
<div id="I30_html"><table width="98%" align=center cellpadding=4 cellspacing=0 bgcolor="#eeeeee" class=shadetabs1><tr><td><font face=arial size=3 class=fontsize2><img src="http://20searchengines.com/images/directions.gif" height=16 width=16 border=0 align=absmiddle></font></td><td valign=middle width="99%"><font face=arial size=3 class=fontsize2><B>Driving Directions</B></font></td><td align=right nowrap><font face=arial size=1 class=fontsize1>Powered By <a href="http://fireburstmaps.yolasite.com">Fireburst Maps</a></font></td></tr></table><table width="85%" bgcolor="#FFFFFF" align=center border=0 cellpadding=6 cellspacing=6><tr><td align=center><form action="http://www.20searchengines.com/texis/open/asb3" target="_blank"><table bgcolor="#FFFFFF" width="100%" border=0 cellpadding=1 cellspacing=1 class=shadetabs3><tr><td colspan=2 align=center><table width="100%" border=0 cellpadding=4 cellspacing=0 bgcolor="#EEEEEE" class=shadetabs4><tr><td align=left><font face=arial size=3 class=fontsize2><B>&nbsp;Departure / Start Address:</B></font></td></tr></table></td></tr><tr><td colspan=2><table bgcolor="#FFFFFF" width="50%" border=0 cellpadding=3 cellspacing=0><tr><td align=left valign=middle><font face=arial size=3 class=fontsize2>Street:</font></td><td align=left><input type="text" size="35" name="street1" value="" maxlength="60" class=tool></td></tr><tr><td align=left valign=middle><font face=arial size=3 class=fontsize2>City:</font></td><td align=left><input type="text" size="35" name="city1" value="" maxlength="60" class=tool></td></tr><tr><td align=left valign=middle><font face=arial size=3 class=fontsize2>State/Province:</font></td><td align=left><select name=state1 size=1 class=tool>
<option value="">Select a State:</option>
<option value="al">Alabama </option>
<option value="ak">Alaska</option>
<option value="az">Arizona </option>
<option value="ar">Arkansas </option>
<option value="ca">California </option>
<option value="co">Colorado </option>
<option value="ct">Connecticut </option>
<option value="de">Delaware </option>
<option value="dc">District of Columbia </option>
<option value="fl">Florida </option>
<option value="ga">Georgia </option>
<option value="hi">Hawaii </option>
<option value="id">Idaho </option>
<option value="il">Illinois </option>
<option value="in">Indiana </option>
<option value="ia">Iowa </option>
<option value="ks">Kansas </option>
<option value="ky">Kentucky </option>
<option value="la">Louisiana </option>
<option value="me">Maine </option>
<option value="md">Maryland </option>
<option value="ma">Massachusetts </option>
<option value="mi">Michigan</option>
<option value="mn">Minnesota </option>
<option value="ms">Mississippi </option>
<option value="mo">Missouri </option>
<option value="mt">Montana </option>
<option value="ne">Nebraska </option>
<option value="nv">Nevada </option>
<option value="nh">New Hampshire </option>
<option value="nj">New Jersey </option>
<option value="nm">New Mexico </option>
<option value="ny">New York </option>
<option value="nc">North Carolina </option>
<option value="nd">North Dakota </option>
<option value="oh">Ohio </option>
<option value="ok">Oklahoma </option>
<option value="or">Oregon </option>
<option value="pa">Pennsylvania </option>
<option value="ri">Rhode Island </option>
<option value="sc">South Carolina </option>
<option value="sd">South Dakota </option>
<option value="tn">Tennessee </option>
<option value="tx">Texas </option>
<option value="ut">Utah </option>
<option value="vt">Vermont </option>
<option value="va">Virginia </option>
<option value="wa">Washington </option>
<option value="wv">West Virginia </option>
<option value="wi">Wisconsin </option>
<option value="wy">Wyoming</option>
</select></td></tr><tr><td align=left valign=middle nowrap><font face=arial size=3 class=fontsize2>ZIP/Postal Code:</font></td><td align=left><input type="text" size="5" name="zip1" value="" maxlength="10" class=tool></td></tr></table></td></tr><tr><td colspan=2 align=center><table width="100%" border=0 cellpadding=4 cellspacing=0 bgcolor="#EEEEEE" class=shadetabs4><tr><td align=left><font face=arial size=3 class=fontsize2><B>&nbsp;Destination / End Address:</B></font></td></tr></table></td></tr><tr><td colspan=2><table bgcolor="#FFFFFF" width="50%" border=0 cellpadding=3 cellspacing=0><tr><td align=left valign=middle><font face=arial size=3 class=fontsize2>Street:</font></td><td align=left><input type="text" size="35" name="street2" value="" maxlength="60" class=tool></td></tr><tr><td align=left valign=middle><font face=arial size=3 class=fontsize2>City:</font></td><td align=left><input type="text" size="35" name="city2" value="" maxlength="60" class=tool></td></tr><tr><td align=left valign=middle><font face=arial size=3 class=fontsize2>State/Province:</font></td><td align=left><select name=state2 size=1 class=tool>
<option value="">Select a State:</option>
<option value="al">Alabama </option>
<option value="ak">Alaska</option>
<option value="az">Arizona </option>
<option value="ar">Arkansas </option>
<option value="ca">California </option>
<option value="co">Colorado </option>
<option value="ct">Connecticut </option>
<option value="de">Delaware </option>
<option value="dc">District of Columbia </option>
<option value="fl">Florida </option>
<option value="ga">Georgia </option>
<option value="hi">Hawaii </option>
<option value="id">Idaho </option>
<option value="il">Illinois </option>
<option value="in">Indiana </option>
<option value="ia">Iowa </option>
<option value="ks">Kansas </option>
<option value="ky">Kentucky </option>
<option value="la">Louisiana </option>
<option value="me">Maine </option>
<option value="md">Maryland </option>
<option value="ma">Massachusetts </option>
<option value="mi">Michigan</option>
<option value="mn">Minnesota </option>
<option value="ms">Mississippi </option>
<option value="mo">Missouri </option>
<option value="mt">Montana </option>
<option value="ne">Nebraska </option>
<option value="nv">Nevada </option>
<option value="nh">New Hampshire </option>
<option value="nj">New Jersey </option>
<option value="nm">New Mexico </option>
<option value="ny">New York </option>
<option value="nc">North Carolina </option>
<option value="nd">North Dakota </option>
<option value="oh">Ohio </option>
<option value="ok">Oklahoma </option>
<option value="or">Oregon </option>
<option value="pa">Pennsylvania </option>
<option value="ri">Rhode Island </option>
<option value="sc">South Carolina </option>
<option value="sd">South Dakota </option>
<option value="tn">Tennessee </option>
<option value="tx">Texas </option>
<option value="ut">Utah </option>
<option value="vt">Vermont </option>
<option value="va">Virginia </option>
<option value="wa">Washington </option>
<option value="wv">West Virginia </option>
<option value="wi">Wisconsin </option>
<option value="wy">Wyoming</option>
</select></td></tr><tr><td align=left valign=middle nowrap><font face=arial size=3 class=fontsize2>ZIP/Postal Code:</font></td><td align=left><input type="text" size="5" name="zip2" value="" maxlength="10" class=tool></td></tr></table></td></tr><tr><td colspan=2 align=center><table width="100%" border=0 cellpadding=4 cellspacing=0 bgcolor="#EEEEEE" class=shadetabs4><tr><td align=left><font face=arial size=3 class=fontsize2><B>&nbsp;Driving Directions Provider:</B></font></td></tr></table></td></tr><tr><td colspan=2><table bgcolor="#FFFFFF" width="50%" border=0 cellpadding=3 cellspacing=0><tr><td nowrap align=left valign=middle><font face=arial size=3 class=fontsize2>Directions From:</font></td><td align=left><SELECT NAME="p" class=tool><option value="googledrive">Google Maps</option><option value="mapquestdrive" selected>MapQuest</option><option value="yahoodrive">Yahoo! Maps</option></SELECT></td></tr></table></td></tr><tr><td valign=middle><BR>&nbsp;<input type="submit" name="Search" value=" Get Driving Directions " class=tool><BR><BR></td></tr></table></FORM></td></tr></table>

</div>


The maps are very convenient and useful. 
Driving DirectionsPowered By 20 Search Engines
 Departure / Start Address:
Street:
City:
State/Province:
ZIP/Postal Code:
 Destination / End Address:
Street:
City:
State/Province:
ZIP/Postal Code:
 Driving Directions Provider:
Directions From:


Thursday, November 15, 2012

Make a webpage RSS feed

Most news sites have things called RSS feeds that you subscribe to and get updates using a feed-reader. It's actually easy to make an RSS feed, using basic XML. This code goes into notepad. Update whenever you have a new post you want to display in the feed
<?xml version="1.0" encoding="ISO-8859-1" ?>
<rss version="2.0">
<channel>
<title>New Feed One</title>
<link>http://site.com/newfeedone</link>
 <description>Start text on articles</description>
<item>
<title>New Post Two</title>
<link>http://site.com/newposttwo</link>
<description>New post on New Post Two</description>
</item>
<item>
<title>New Post Three</title>
<link>http://www.site.com/newpostthree</link>
<description>description</description>
</item>
</channel>
</rss>

Save as "feed.xml" but you can change anything except .xml.

Add categories with this code:
<category>Web development</category>

Tuesday, October 30, 2012

Special Symbols ¢, ™, ® and others

Trademark, copyright, and other symbols may be displayed in webpages by way of simple HTML code. Here they are:

®      &reg;
¢       &cent; 
™      &trade;
¿       &iquest;
©      &copy;
÷      &divide;
§       &sect;
¥       &yen;
£       &pound;
€       &euro;
µ       &micro;
¶       &para;
±       &plusmn;
·        &middot;

How to display this chart with the codes:
</span>® &nbsp; &nbsp; &nbsp;&amp;reg;<br />
¢ &nbsp; &nbsp; &nbsp; &amp;cent;&nbsp; <br />
™ &nbsp; &nbsp; &nbsp;&amp;trade;<br />
¿ &nbsp; &nbsp; &nbsp; &amp;iquest;<br />
© &nbsp; &nbsp; &nbsp;&amp;copy;<br />
÷ &nbsp; &nbsp; &nbsp;&amp;divide;<br />
§ &nbsp; &nbsp; &nbsp; &amp;sect;<br />
¥ &nbsp; &nbsp; &nbsp; &amp;yen;<br />
£ &nbsp; &nbsp; &nbsp; &amp;pound;<br />
€ &nbsp; &nbsp; &nbsp; &amp;euro;<br />
µ &nbsp; &nbsp; &nbsp; &amp;micro;<br />
¶ &nbsp; &nbsp; &nbsp; &amp;para;<br />
± &nbsp; &nbsp; &nbsp; &amp;plusmn; <br />
· &nbsp; &nbsp; &nbsp; &nbsp;&amp;middot;<br />
&nbsp; <br />

Sunday, October 28, 2012

Two page, more customizable GCSE for Blogger

Google Custom Search is a powerful tool to search websites. You can get a Blog search from the layout and gadgets section of Blogger.The downside of this is that it isn't that customizable. This will show you how to add your own GCSE to Blogger and have a separate page for results. It's simple.
Log into Blogger, and select "pages" of the blog you want to add search too. Make sure its set to "don't show pages." Then create a new page and name it "search" or "search results."  When the editor comes up click publish and go back to page list. Click "view" and copy the URL. The page section should look like the image at left. Go to Google Custom Search and click "make new search engine."

In "name" enter any thing, and in "sites" enter the URL of your blog. Make sure you select the free option and that you agree to the terms of use. Click next, choose a style, which you can customize. Then click next. DO NOT COPY THE CODE. Go to the sites tab and exclude the URL of your search results page.

Then go to "look and feel" and select the "two page" option. 
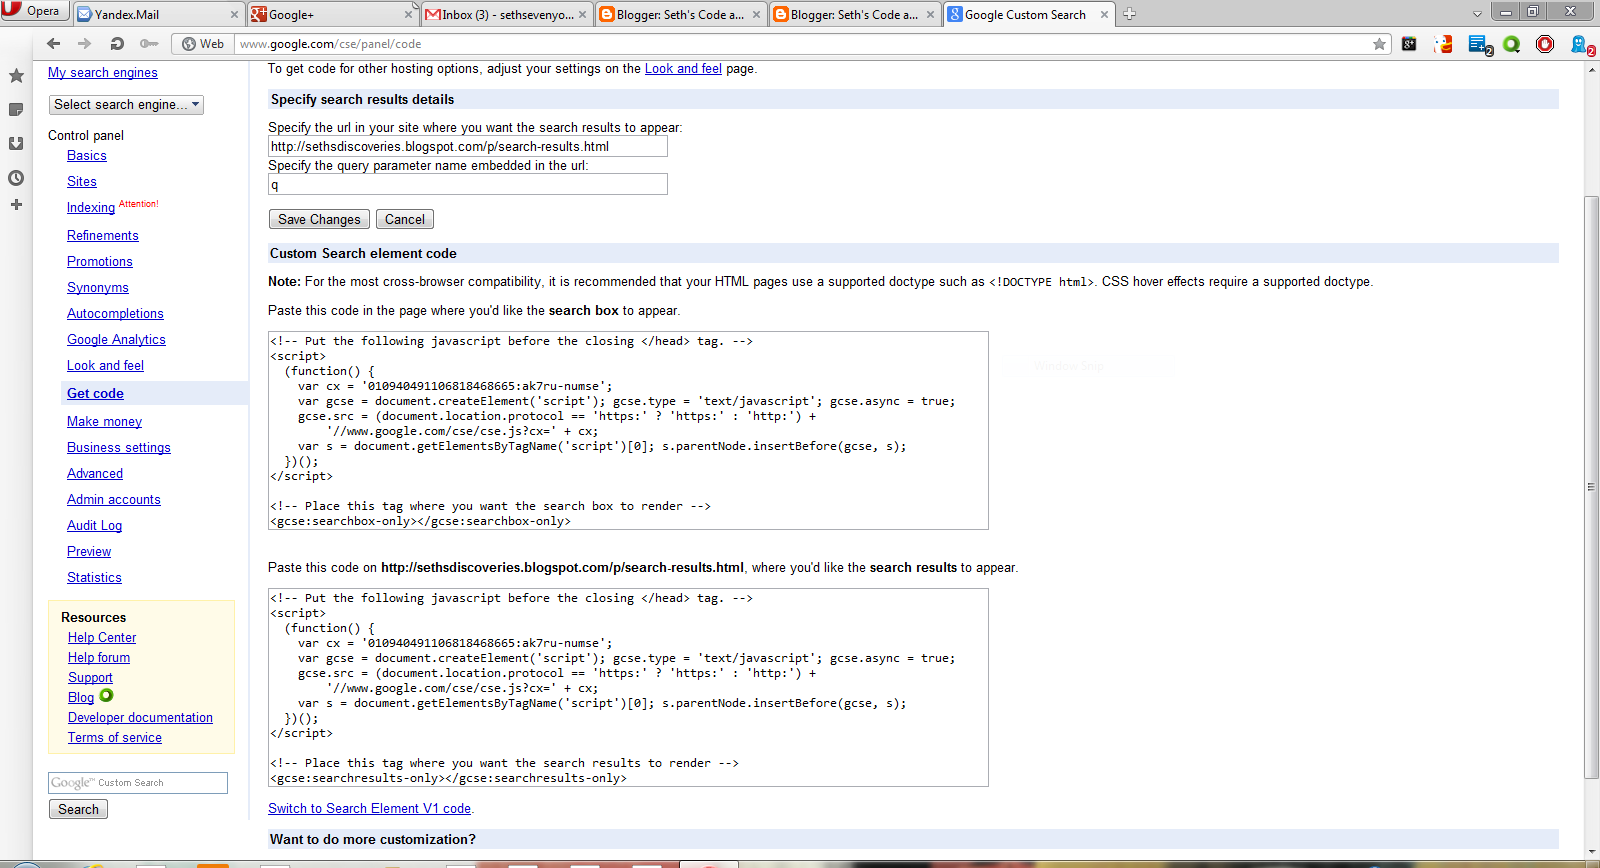
Then click "save and get code." In the box where it tells you to specify the URL where the search results are to appear, enter the URL of "search" or "search results."

Copy the code. Go to blogger, then go to "pages" of the blog you are adding search to, and click edit. When you get the code you will have to remove some of it for cross browser compatibility so it will work with Firefox and Opera. This is the search results code. The text highlighted in red you must remove:
<!-- Put the following javascript before the closing </head> tag. -->
<script>
(function() {
  var cx = 'Your Search Engines ID:ak7ru-numse';
var gcse = document.createElement('script'); gcse.type = 'text/javascript'; gcse.async = true;
gcse.src = (document.location.protocol == 'https:' ? 'https:' : 'http:') +
'//www.google.com/cse/cse.js?cx=' + cx;
var s = document.getElementsByTagName('script')[0]; s.parentNode.insertBefore(gcse, s);
})();
</script>

<!-- Place this tag where you want the search results to render -->
<gcse:searchresults-only></gcse:searchresults-only>
CLick HTML in the post editor and paste the code there. It should look like this: 

Click save. Now go to layout, and click "add gadget." Paste the code for the  search box there, click save and you're set!

Thursday, October 25, 2012

Links, part 3: Colors & CSS

In a previous post I explained the link. In this post I will go into how to change link colors, add hover effects and visited colors. The first will be changing the link colors by some basic HTML in the body. Insert this code between the <body> and </body> tags.
<body link="#C0C0C0" vlink="#808080" alink="#FF0000">
body link is when the link is displayed on the page. #COCOCO is the blue you see everywhere. vlink is the visited color. #808080 is the purple you see on most pages when you revisit a page after clicking a link. #FF0000 is red, and alink is the hover color. 

Link color in your CSS stylesheet

Its easy, and you can do even more, like making a link suddenly underline when hovered over. Here's the code:

a.nav:link {color: blue; text-decoration: none; }
a.nav:visited {color: purple; text-decoration: none; }
a.nav:hover {color: green; text-decoration: underline; }
a.nav:active {color: red; }

Multiple Link effects through CSS stylesheet
You can make "classes" of link effects in CSS that will make links in each class act differently. For example, you could make a class called nav for links in the body, and a class called foot for links in the footer. Here is the code: 
a.nav:link {color: blue; text-decoration: none; }
a.nav:visited {color: purple; text-decoration: none; }
a.nav:hover {color: green; text-decoration: underline; }
a.nav:active {color: red; }


a.foot:link {color: red; font-size: 14pt; font-weight: bold; }
a.foot:visited {color: green; font-weight: bold; }
a.foot:hover {text-decoration: underline; background-color: blue; }
a.foot:active {color: orange; }
Using the classes
It's much simpler than individually changing every link that you want different from the settings you put. 

For the class nav use this code: <a href="URL" class="nav">Link Text</a>

For the class foot use this code: <a href="URL" class="nav">Link Text</a>

Links, Part 1: The basic link

Links are an almost irremovable part of a site or even a page. Links are used to lead to other pages, other sites, even emails.  Fortunately, links are very easy. In this post I will go over the hyperlink, the email link and the image link. The basic link code is <a href="http://sethstutorials.blogspot.com">Seth's Code & PC Tutorials</a> Replace with http://sethstutorials.blogspot.com  with the address of the site you want to link to. Replace Seth's Code & PC Tutorials with the text you want your links to display.

Email Link

The email link is simple. The code is:
<a href="mailto:sethsevenyoln@aol.com">Email Me</a>
Replace sethsevenyoln@aol.com with your email address, and Email Me with the text you want displayed.
Image Link

The image link is a bit more complicated. Still, its quite possible. The code is:
<a href="http://fireburst.webs.com"><img src="image.gif" border="0"></a>

Replace http://fireburst.webs.com with the URL of the site you want to link to, and image.gif with the URL of the image you want displayed. 

Opening a link in a new tab

If you want a link to be opened in a new tab, for the basic link use this code:


<a href="http://url" target="_blank">link text</a>


Monday, October 22, 2012

CSS Stylesheets or Syncing Webpages Easily

Css was made to save time. If you have a site where you want all the background colors, links, text, link hover colors and stuff like that to be the same on all pages, CSS stylesheets are the quickest way to do that. In fact, CSS stands for Cascading Style Sheets. 
1. Open notepad or any plain-text editor. Enter this code: Highlighted text is for you to change.
h3
{
 color:black;
text-align:left;
font-size:8pt;
}


Now for the Background. Remember, multiple styles cascade into one style.

body {background-color:#FFFFFF;}

You could also use an image background. This is for positioning an image in the top right corner.:
body
{
 background-image:url('image_URL');
background-repeat:no-repeat;
back
ground-position:right top;
}


If you want the image to repeat the whole length of the page:
body
{
 background-image:url('image_URL.png');
background-repeat:repeat-x;
}


Save as "Stylesheet.css"
2.Adding the style sheet to webpages. Insert this code between the <head> AND </HEAD> tags. This is where the <TITLE> tag is. 

<link rel="stylesheet" type="text/css" href="stylesheet.css" />

Wednesday, September 26, 2012

HTML text

Html is an old programming code used quite often in webpages. This post is to show you how to write rich text in HTML. HTML is supported by all browsers. This does not include color, however. 
1. Fonts
Fonts are the way the text looks. the most common fonts and their code are:
Times New Roman: <span style="font-family: Times, Times New Roman, serif;">
Arial: <span style="font-family: Arial, Helvetica, sans-serif;">
Verdana: <span style="font-family: Verdana, sans-serif;">
Helvectica: <span style="font-family: Helvetica Neue, Arial, Helvetica, sans-serif;">
Georgia: <span style="font-family: Georgia, Times New Roman, serif;">
Courier New:<span style="font-family: Courier New, Courier, monospace;">
Trebuchet: <span style="font-family: Trebuchet MS, sans-serif;">
When you want a font to end and display the browser's defaut font, use this closing tag: </span> You can get many more fonts and their codes at the Google Web Fonts Directory'
2. Size
So how do you get your font size to change? Simple. The size tags. They are <h1></h1> <h2></h2> <h3></h3> <h4></h4> <h5></h5> <h6></h6> 
<h1> is the largest, and I do not know how far the fine print goes down. </h1> is the closing tag. 
3. Effects
The italics tag is <i>, while the closing tag is </i> example: This is Italics.
The bold tag is <b> with the closing tag of </b>
The underline tag is <u> while the closing tag is </u>
The strike through tag  is <strike> while the closing tag is </strike>
The Subscript  tag is <sub> and the closing tag is </sub>
The Superscript tag is <sup> while the closing tag is </sup>
<marquee> makes the text roll.example </marquee> is the closing tag. example 
<blink> makes the text blink in Firefox. </blink> is the closing tag.