One of the problems I had with GCSE on my blog was that it always opened links in a new window or tab. This wasn't very convenient, but I only had to change a little code in the results code.
Before Modification:
<!-- Put the following javascript before the closing </head> tag. -->
<script>
(function() {
var cx = '010940491106818468665:ak7ru-numse';
var gcse = document.createElement('script'); gcse.type = 'text/javascript'; gcse.async = true;
gcse.src = (document.location.protocol == 'https:' ? 'https:' : 'http:') +
'//' + cx;
var s = document.getElementsByTagName('script')[0]; s.parentNode.insertBefore(gcse, s);
})();
</script>
<!-- Place this tag where you want the search results to render -->
<gcse:searchresults-only></gcse:searchresults-only>
After Modification (when the results open in same tab):
<!-- Put the following javascript before the closing </head> tag. -->
<script>
(function() {
var cx = '010940491106818468665:ak7ru-numse';
var gcse = document.createElement('script'); gcse.type = 'text/javascript'; gcse.async = true;
gcse.src = (document.location.protocol == 'https:' ? 'https:' : 'http:') +
'//' + cx;
var s = document.getElementsByTagName('script')[0]; s.parentNode.insertBefore(gcse, s);
})();
</script>
<!-- Place this tag where you want the search results to render -->
<gcse:searchresults-only linktarget="_parent"></gcse:searchresults-only>
I replaced
<gcse:searchresults-only> with
<gcse:searchresults-only linktarget="_parent">.
Showing posts with label compatibility. Show all posts
Showing posts with label compatibility. Show all posts
Monday, October 29, 2012

Sunday, October 28, 2012
Site Title, Description & Tags in HTML
The title, description and tags are viable to SEO. Search engines use these to help match your site with searches. Most site builders offer completely customized title, description and tags but you need to add these manually in HTML, PHP, and other manually edited documents. The code is inserted into the <head> and </head> tags:
<TITLE>My Site's Title</TITLE>
<meta name="keywords" content="Separate keywords with commas.">
<meta name="description" content="My site's description, two or three sentences.">
<meta name="author" content="Your Name">
A well formed head tag will follow this format:
<head>
<TITLE>My Site's Title</TITLE>
<meta name="keywords" content="Separate keywords with commas.">
<meta name="description" content="My site's description, two or three sentences.">
<link rel="stylesheet" type="text/css" href="stylesheet.css" />
<meta http-equiv="refresh" content="100">
<link rel="Shortcut Icon" href="/favicon.ico">
</head>
For more <head> tags see all posts with the label head. You may omit the meta tags about keyword and description. You may omit any of these <head> tags.
<TITLE>My Site's Title</TITLE>
<meta name="keywords" content="Separate keywords with commas.">
<meta name="description" content="My site's description, two or three sentences.">
<meta name="author" content="Your Name">
A well formed head tag will follow this format:
<head>
<TITLE>My Site's Title</TITLE>
<meta name="keywords" content="Separate keywords with commas.">
<meta name="description" content="My site's description, two or three sentences.">
<link rel="stylesheet" type="text/css" href="stylesheet.css" />
<meta http-equiv="refresh" content="100">
<link rel="Shortcut Icon" href="/favicon.ico">
</head>
For more <head> tags see all posts with the label head. You may omit the meta tags about keyword and description. You may omit any of these <head> tags.
Two page, more customizable GCSE for Blogger
Google Custom Search is a powerful tool to search websites. You can get a Blog search from the layout and gadgets section of Blogger.The downside of this is that it isn't that customizable. This will show you how to add your own GCSE to Blogger and have a separate page for results. It's simple.
 Log into Blogger, and select "pages" of the blog you want to add search too. Make sure its set to "don't show pages." Then create a new page and name it "search" or "search results." When the editor comes up click publish and go back to page list. Click "view" and copy the URL. The page section should look like the image at left. Go to Google Custom Search and click "make new search engine."

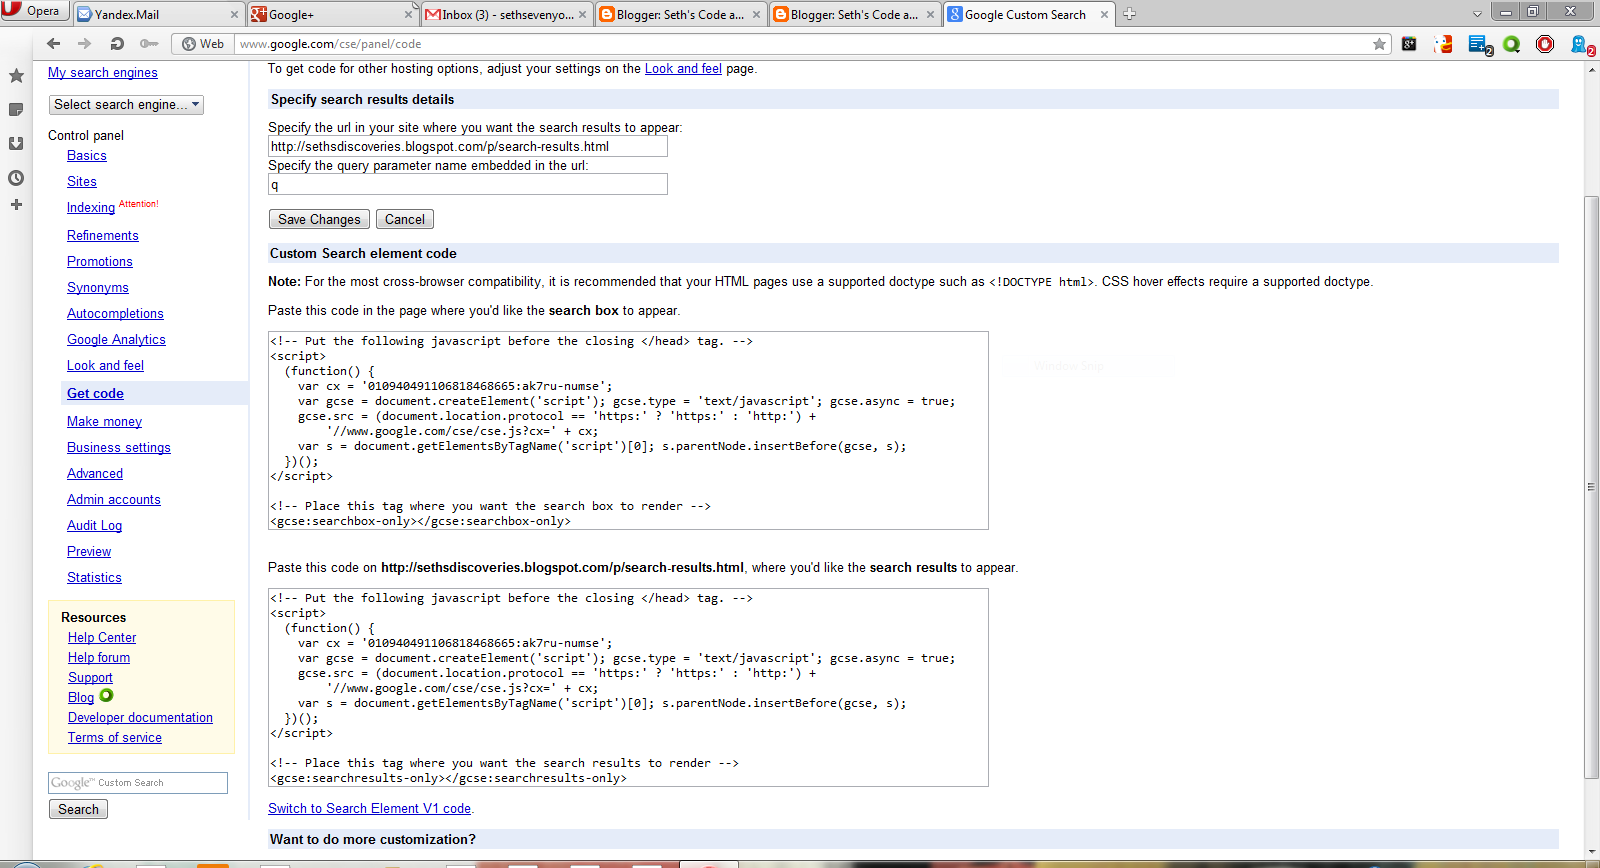

Click save. Now go to layout, and click "add gadget." Paste the code for the search box there, click save and you're set!
In "name" enter any thing, and in "sites" enter the URL of your blog. Make sure you select the free option and that you agree to the terms of use. Click next, choose a style, which you can customize. Then click next. DO NOT COPY THE CODE. Go to the sites tab and exclude the URL of your search results page.

Then go to "look and feel" and select the "two page" option.
Then click "save and get code." In the box where it tells you to specify the URL where the search results are to appear, enter the URL of "search" or "search results."
Copy the code. Go to blogger, then go to "pages" of the blog you are adding search to, and click edit. When you get the code you will have to remove some of it for cross browser compatibility so it will work with Firefox and Opera. This is the search results code. The text highlighted in red you must remove:
<!-- Put the following javascript before the closing </head> tag. -->
<script>
(function() {
var cx = 'Your Search Engines ID:ak7ru-numse';
var gcse = document.createElement('script'); gcse.type = 'text/javascript'; gcse.async = true;
gcse.src = (document.location.protocol == 'https:' ? 'https:' : 'http:') +
'//www.google.com/cse/cse.js?cx=' + cx;
var s = document.getElementsByTagName('script')[0]; s.parentNode.insertBefore(gcse, s);
})();
</script>
<!-- Place this tag where you want the search results to render -->
<gcse:searchresults-only></gcse:searchresults-only>
<script>
(function() {
var cx = 'Your Search Engines ID:ak7ru-numse';
var gcse = document.createElement('script'); gcse.type = 'text/javascript'; gcse.async = true;
gcse.src = (document.location.protocol == 'https:' ? 'https:' : 'http:') +
'//www.google.com/cse/cse.js?cx=' + cx;
var s = document.getElementsByTagName('script')[0]; s.parentNode.insertBefore(gcse, s);
})();
</script>
<!-- Place this tag where you want the search results to render -->
<gcse:searchresults-only></gcse:searchresults-only>
CLick HTML in the post editor and paste the code there. It should look like this:
Click save. Now go to layout, and click "add gadget." Paste the code for the search box there, click save and you're set!

Thursday, October 25, 2012
Links, part 3: Colors & CSS
In a previous post I explained the link. In this post I will go into how to change link colors, add hover effects and visited colors. The first will be changing the link colors by some basic HTML in the body. Insert this code between the <body> and </body> tags.
<body link="#C0C0C0" vlink="#808080" alink="#FF0000">
body link is when the link is displayed on the page. #COCOCO is the blue you see everywhere. vlink is the visited color. #808080 is the purple you see on most pages when you revisit a page after clicking a link. #FF0000 is red, and alink is the hover color.
Link color in your CSS stylesheet
Its easy, and you can do even more, like making a link suddenly underline when hovered over. Here's the code:
a.nav:link {color: blue; text-decoration: none; }
a.nav:visited {color: purple; text-decoration: none; }
a.nav:hover {color: green; text-decoration: underline; }
a.nav:active {color: red; }
Multiple Link effects through CSS stylesheet
You can make "classes" of link effects in CSS that will make links in each class act differently. For example, you could make a class called nav for links in the body, and a class called foot for links in the footer. Here is the code:
a.nav:link {color: blue; text-decoration: none; }
a.nav:visited {color: purple; text-decoration: none; }
a.nav:hover {color: green; text-decoration: underline; }
a.nav:active {color: red; }
a.foot:link {color: red; font-size: 14pt; font-weight: bold; }
a.foot:visited {color: green; font-weight: bold; }
a.foot:hover {text-decoration: underline; background-color: blue; }
a.foot:active {color: orange; }Using the classes
It's much simpler than individually changing every link that you want different from the settings you put.
For the class nav use this code: <a href="URL" class="nav">Link Text</a>
For the class foot use this code: <a href="URL" class="nav">Link Text</a>
<body link="#C0C0C0" vlink="#808080" alink="#FF0000">
body link is when the link is displayed on the page. #COCOCO is the blue you see everywhere. vlink is the visited color. #808080 is the purple you see on most pages when you revisit a page after clicking a link. #FF0000 is red, and alink is the hover color.
Link color in your CSS stylesheet
Its easy, and you can do even more, like making a link suddenly underline when hovered over. Here's the code:
a.nav:link {color: blue; text-decoration: none; }
a.nav:visited {color: purple; text-decoration: none; }
a.nav:hover {color: green; text-decoration: underline; }
a.nav:active {color: red; }
Multiple Link effects through CSS stylesheet
You can make "classes" of link effects in CSS that will make links in each class act differently. For example, you could make a class called nav for links in the body, and a class called foot for links in the footer. Here is the code:
a.nav:link {color: blue; text-decoration: none; }
a.nav:visited {color: purple; text-decoration: none; }
a.nav:hover {color: green; text-decoration: underline; }
a.nav:active {color: red; }
a.foot:link {color: red; font-size: 14pt; font-weight: bold; }
a.foot:visited {color: green; font-weight: bold; }
a.foot:hover {text-decoration: underline; background-color: blue; }
a.foot:active {color: orange; }Using the classes
It's much simpler than individually changing every link that you want different from the settings you put.
For the class nav use this code: <a href="URL" class="nav">Link Text</a>
For the class foot use this code: <a href="URL" class="nav">Link Text</a>
Tuesday, October 23, 2012
How to tell users IE is incompatible
Internet Explorer is Microsoft's web browser. It's the second most popular in the world, but unfortunately, its web standard support is extremely limited. Fortunately, its easy to tell users to upgrade.
For IE6
IE 6 supports almost nothing, so don't be afraid to tell users to upgrade. It doesn't support Google CSE, or any advanced CSS. Here's how to tell users to upgrade IE 6. I know it says IE 7, but it won't do any warnings in IE 7. Insert this code between the <head> and </head> tags.
<!--[if lt IE 7]> <div style='border: 1px solid #F7941D; background: #FEEFDA; text-align: center; clear: both; height: 75px; position: relative;'> <div style='position: absolute; right: 3px; top: 3px; font-family: courier new; font-weight: bold;'><a href='#' onclick='javascript:this.parentNode.parentNode.style.display="none"; return false;'><img src='http://www.ie6nomore.com/files/theme/ie6nomore-cornerx.jpg' style='border: none;' alt='Close this notice'/></a></div> <div style='width: 640px; margin: 0 auto; text-align: left; padding: 0; overflow: hidden; color: black;'> <div style='width: 100px; float: left;'><img src='http://www.ie6nomore.com/files/theme/ie6nomore-warning.jpg' alt='Warning!'/></div> <div style='width: 275px; float: left; font-family: Arial, sans-serif;'> <div style='font-size: 14px; font-weight: bold; margin-top: 12px;'>You are using an outdated browser</div> <div style='font-size: 12px; margin-top: 6px; line-height: 12px;'>The browser you're using is slow, cumbersome, and outdated. <a href="http://opera.com">Click here</a> to get an up to update your browser easily or choose one of the links at right.</div> </div> <div style='width: 100px; float: left;'><a href='http://www.opera.com' target='_blank'><img src='https://blogger.googleusercontent.com/img/b/R29vZ2xl/AVvXsEjYSwsZe3Taot9flGWq3Tka26n4SiWRFTHkse5dLsk19wwCkFjJb_JfrhNAdwnnPuktxNnYz6YWGJZDRmvq49IzYfUkAVUOb8YcocPzBhg1ekHDDHnUe__bRCx58FgRzcow-ViOU2XQFvk2/s1600/opera.jpeg' style='border: none;' alt='Get Opera 12'/></a>or get <a href="http://maxthon.com">Maxthon</a> <a HREF="http://mozilla.org/firefox">Firefox</a> <a href="http://dragon.comodo.com">Comodo Dragon</a> <p><a href="http://apple.com/safari">Safari</a> <A href="http://coolnovo.com">Coolnovo</a></div> </div> </div> <![endif]-->
For All Versions of IE NOT RECOMMENDED.
Insert between the <head> and </head> tags
<!--[if lt IE 9]> <div style='border: 1px solid #F7941D; background: #FEEFDA; text-align: center; clear: both; height: 75px; position: relative;'> <div style='position: absolute; right: 3px; top: 3px; font-family: courier new; font-weight: bold;'><a href='#' onclick='javascript:this.parentNode.parentNode.style.display="none"; return false;'><img src='http://www.ie6nomore.com/files/theme/ie6nomore-cornerx.jpg' style='border: none;' alt='Close this notice'/></a></div> <div style='width: 640px; margin: 0 auto; text-align: left; padding: 0; overflow: hidden; color: black;'> <div style='width: 100px; float: left;'><img src='http://www.ie6nomore.com/files/theme/ie6nomore-warning.jpg' alt='Warning!'/></div> <div style='width: 275px; float: left; font-family: Arial, sans-serif;'> <div style='font-size: 14px; font-weight: bold; margin-top: 12px;'>You are using an outdated browser</div> <div style='font-size: 12px; margin-top: 6px; line-height: 12px;'>The browser you're using is slow, cumbersome, and outdated. <a href="http://opera.com">Click here</a> to get an up to update your browser easily or choose one of the links at right.</div> </div> <div style='width: 100px; float: left;'><a href='http://www.opera.com' target='_blank'><img src='https://blogger.googleusercontent.com/img/b/R29vZ2xl/AVvXsEjYSwsZe3Taot9flGWq3Tka26n4SiWRFTHkse5dLsk19wwCkFjJb_JfrhNAdwnnPuktxNnYz6YWGJZDRmvq49IzYfUkAVUOb8YcocPzBhg1ekHDDHnUe__bRCx58FgRzcow-ViOU2XQFvk2/s1600/opera.jpeg' style='border: none;' alt='Get Opera 12'/></a>or get <a href="http://maxthon.com">Maxthon</a> <a HREF="http://mozilla.org/firefox">Firefox</a> <a href="http://dragon.comodo.com">Comodo Dragon</a> <p><a href="http://apple.com/safari">Safari</a> <A href="http://coolnovo.com">Coolnovo</a></div> </div> </div> <![endif]-->
For IE6
IE 6 supports almost nothing, so don't be afraid to tell users to upgrade. It doesn't support Google CSE, or any advanced CSS. Here's how to tell users to upgrade IE 6. I know it says IE 7, but it won't do any warnings in IE 7. Insert this code between the <head> and </head> tags.
<!--[if lt IE 7]> <div style='border: 1px solid #F7941D; background: #FEEFDA; text-align: center; clear: both; height: 75px; position: relative;'> <div style='position: absolute; right: 3px; top: 3px; font-family: courier new; font-weight: bold;'><a href='#' onclick='javascript:this.parentNode.parentNode.style.display="none"; return false;'><img src='http://www.ie6nomore.com/files/theme/ie6nomore-cornerx.jpg' style='border: none;' alt='Close this notice'/></a></div> <div style='width: 640px; margin: 0 auto; text-align: left; padding: 0; overflow: hidden; color: black;'> <div style='width: 100px; float: left;'><img src='http://www.ie6nomore.com/files/theme/ie6nomore-warning.jpg' alt='Warning!'/></div> <div style='width: 275px; float: left; font-family: Arial, sans-serif;'> <div style='font-size: 14px; font-weight: bold; margin-top: 12px;'>You are using an outdated browser</div> <div style='font-size: 12px; margin-top: 6px; line-height: 12px;'>The browser you're using is slow, cumbersome, and outdated. <a href="http://opera.com">Click here</a> to get an up to update your browser easily or choose one of the links at right.</div> </div> <div style='width: 100px; float: left;'><a href='http://www.opera.com' target='_blank'><img src='https://blogger.googleusercontent.com/img/b/R29vZ2xl/AVvXsEjYSwsZe3Taot9flGWq3Tka26n4SiWRFTHkse5dLsk19wwCkFjJb_JfrhNAdwnnPuktxNnYz6YWGJZDRmvq49IzYfUkAVUOb8YcocPzBhg1ekHDDHnUe__bRCx58FgRzcow-ViOU2XQFvk2/s1600/opera.jpeg' style='border: none;' alt='Get Opera 12'/></a>or get <a href="http://maxthon.com">Maxthon</a> <a HREF="http://mozilla.org/firefox">Firefox</a> <a href="http://dragon.comodo.com">Comodo Dragon</a> <p><a href="http://apple.com/safari">Safari</a> <A href="http://coolnovo.com">Coolnovo</a></div> </div> </div> <![endif]-->
For All Versions of IE NOT RECOMMENDED.
Insert between the <head> and </head> tags
<!--[if lt IE 9]> <div style='border: 1px solid #F7941D; background: #FEEFDA; text-align: center; clear: both; height: 75px; position: relative;'> <div style='position: absolute; right: 3px; top: 3px; font-family: courier new; font-weight: bold;'><a href='#' onclick='javascript:this.parentNode.parentNode.style.display="none"; return false;'><img src='http://www.ie6nomore.com/files/theme/ie6nomore-cornerx.jpg' style='border: none;' alt='Close this notice'/></a></div> <div style='width: 640px; margin: 0 auto; text-align: left; padding: 0; overflow: hidden; color: black;'> <div style='width: 100px; float: left;'><img src='http://www.ie6nomore.com/files/theme/ie6nomore-warning.jpg' alt='Warning!'/></div> <div style='width: 275px; float: left; font-family: Arial, sans-serif;'> <div style='font-size: 14px; font-weight: bold; margin-top: 12px;'>You are using an outdated browser</div> <div style='font-size: 12px; margin-top: 6px; line-height: 12px;'>The browser you're using is slow, cumbersome, and outdated. <a href="http://opera.com">Click here</a> to get an up to update your browser easily or choose one of the links at right.</div> </div> <div style='width: 100px; float: left;'><a href='http://www.opera.com' target='_blank'><img src='https://blogger.googleusercontent.com/img/b/R29vZ2xl/AVvXsEjYSwsZe3Taot9flGWq3Tka26n4SiWRFTHkse5dLsk19wwCkFjJb_JfrhNAdwnnPuktxNnYz6YWGJZDRmvq49IzYfUkAVUOb8YcocPzBhg1ekHDDHnUe__bRCx58FgRzcow-ViOU2XQFvk2/s1600/opera.jpeg' style='border: none;' alt='Get Opera 12'/></a>or get <a href="http://maxthon.com">Maxthon</a> <a HREF="http://mozilla.org/firefox">Firefox</a> <a href="http://dragon.comodo.com">Comodo Dragon</a> <p><a href="http://apple.com/safari">Safari</a> <A href="http://coolnovo.com">Coolnovo</a></div> </div> </div> <![endif]-->
Monday, September 24, 2012
Make Opera Compatable with any site
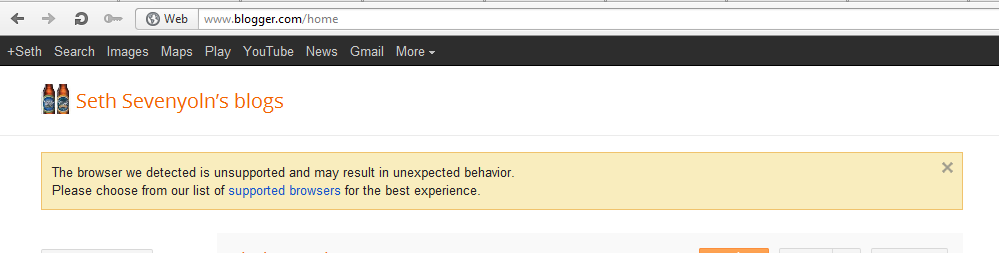
Sometimes, sites say that your Opera is not compatible. This means that you cannot use Opera to access that site. However, Opera offers a nifty way to get around this, for most sites support Opera 12 and up, even if they don't know it. And, with many Google services, you will see something like this:

So you right click on the site and it will display a menu. The second option from the bottom should be "edit site preferences". Click this and you should see something like this:

Click on "Network" and something like this should come up:

Click on the drop down menu where it says "identify as Opera and select Mask as Firefox. When you are finished you will see this:

Click "OK" and refresh the page. Do this to any page that says it is not compatible with Opera.
So you right click on the site and it will display a menu. The second option from the bottom should be "edit site preferences". Click this and you should see something like this:

Click on "Network" and something like this should come up:

Click on the drop down menu where it says "identify as Opera and select Mask as Firefox. When you are finished you will see this:

Click "OK" and refresh the page. Do this to any page that says it is not compatible with Opera.
Subscribe to:
Posts (Atom)


